Android 5 e versioni successive consentono alle app di salvare/sincronizzare/modificare contenuti in directory condivise (ad esempio /Musica). Se non ci riesci, è probabile che uno dei seguenti requisiti non sia soddisfatto:
- Autorizzazione : MediaMonkey per Android deve disporre dell'autorizzazione di scrittura nella posizione di archiviazione per poter modificare/eliminare/sincronizzare i contenuti.
- Inclusione nella libreria : affinché il contenuto sia visibile nella libreria MediaMonkey per Android, la posizione in cui si trova il contenuto deve essere configurata per far parte della libreria.
- Profilo di sincronizzazione : MediaMonkey per Android e MediaMonkey per Windows devono essere configurati correttamente per sincronizzarsi tra loro.
Permesso
Sulla maggior parte dei dispositivi con Android 5 e versioni successive*, MediaMonkey è in grado di accedere/sincronizzare directory come /Musica o /Video su una scheda SD una volta che è stata concessa l'autorizzazione ad accedere alla scheda SD. Sui dispositivi con Android 11 e versioni successive, MediaMonkey 2 utilizza le nuove tecnologie di privacy/sicurezza di Android per limitare l'accesso di MediaMonkey specificamente alle cartelle a cui è stato concesso l'accesso.
Su alcuni dispositivi Samsung, Oppo e Vivo , la concessione dell'accesso alla cartella potrebbe non riuscire e le operazioni daranno luogo a un errore " Permission Denied ". Puoi aggirare questo problema:
- Impostazione manuale di Android per poter accettare le richieste delle applicazioni per le autorizzazioni delle cartelle:
- Vai nelle Impostazioni Android e cerca "Accesso a tutti i file" e toccalo
- Tocca il menu a 3 punti nell'angolo in alto a destra e tocca "Mostra sistema"
- Nell'elenco, individua e tocca "Archiviazione esterna"
- Abilitare l'impostazione di autorizzazione "Consenti l'accesso per gestire tutti i file"
- Riavviare MediaMonkey e concedere le autorizzazioni quando richiesto
- Su alcuni dispositivi potrebbe funzionare concedere manualmente a MediaMonkey l'accesso alla scheda SD:
- Vai nelle Impostazioni Android
- Vai su "Sicurezza e privacy" -> "Privacy" -> "Gestione autorizzazioni" -> "File e contenuti multimediali"
- Tocca il menu a 3 punti nell'angolo in alto a destra e tocca "Mostra sistema"
- Quindi tocca "Visualizza altre app che possono accedere a tutti i file"
- Abilita “Archiviazione esterna” per MediaMonkey
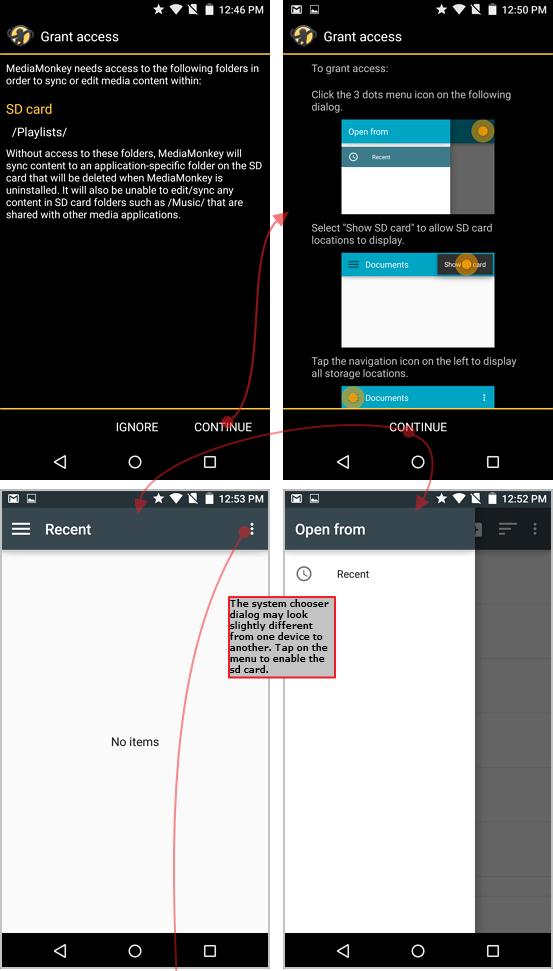
MediaMonkey normalmente richiede automaticamente le autorizzazioni necessarie per leggere/scrivere/eliminare contenuti in directory specifiche. Inoltre, dal menu Opzioni > Libreria e sincronizzazione > Scegli cartelle della libreria, mostrerà se ci sono problemi di autorizzazione che impediscono l'accesso a parti della libreria. Le schermate seguenti illustrano come MediaMonkey 1.x consente di concedere l'accesso alla scheda SD. Queste finestre di dialogo funzionano in modo simile per MMA 2.x, ma ricorda: su Android 11 e versioni successive è necessario concedere l'accesso a directory specifiche (anziché a un supporto di memorizzazione):
- MediaMonkey visualizza automaticamente una finestra di dialogo che chiede all'utente di concedere l'accesso in scrittura a una cartella sulla scheda SD (se l'utente salta questa fase, è possibile riavviarla tramite Opzioni > Concedi accesso a memoria esterna).
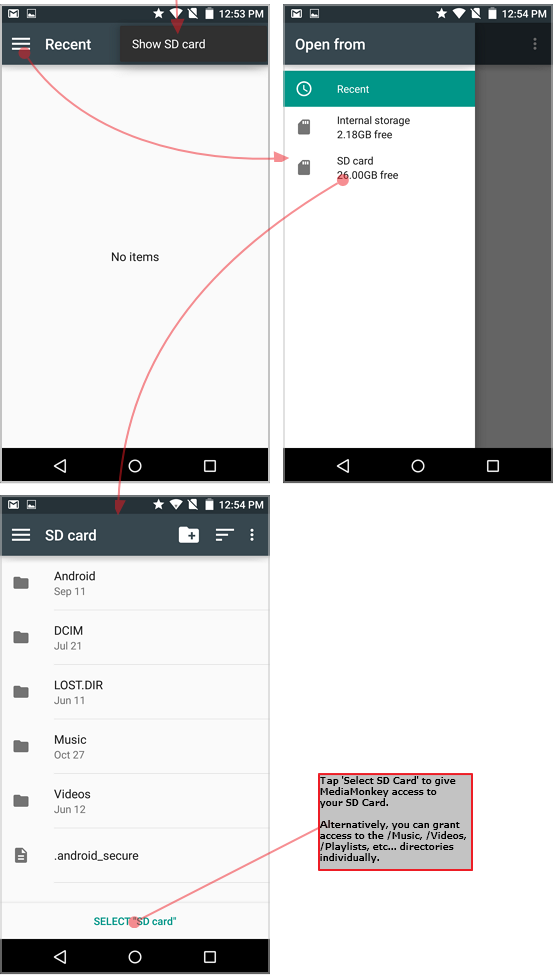
- MediaMonkey apre quindi una finestra di dialogo per la selezione delle cartelle di sistema Android, dalla quale l'utente può scegliere una cartella specifica (o l'intera scheda SD) per concedere a MediaMonkey l'accesso a quella posizione.
Importante: per impedire ad Android di rimuovere le autorizzazioni di MediaMonkey (ciò può accadere se si utilizza MediaMonkey solo periodicamente), toccare e tenere premuta l'icona di MediaMonkey, premere "Informazioni" e disattivare "Rimuovi autorizzazioni se l'app non è utilizzata").
Nota:
- Alcune versioni personalizzate di Android potrebbero non avere l'opzione "Mostra scheda SD". Ad esempio:
- Su alcuni dispositivi Huawei, "Apri da" (vedi sopra) mostrerà le schede SD solo dopo aver abilitato [x] Mostra dispositivi avanzati (in "Impostazioni"). Quindi vai alla scheda SD e "Seleziona tutto" (poiché non esiste l'opzione "Seleziona scheda SD").
- Su alcuni dispositivi Xiaomi, dopo aver installato MediaMonkey (ma prima di eseguirlo), devi andare su Impostazioni, toccare App installate, toccare Documenti, toccare l'icona "Abilita" in basso per concedere l'accesso. Quindi esegui MediaMonkey per la prima volta.
- Le cartelle condivise potrebbero non essere supportate su alcuni dispositivi se MediaMonkey non è in grado di convalidare l'archiviazione esterna. Per tali dispositivi la sincronizzazione è limitata alla scrittura su cartelle specifiche dell'app.
Inclusione nella biblioteca
Una volta concesse le autorizzazioni, MediaMonkey sposterà automaticamente i file dalle directory specifiche dell'app (ad esempio da SD Card/Android/Data/com.ventismedia.mediamonkey/Music) alle directory condivise (ad esempio SD Card/Music) e includerà automaticamente le posizioni multimediali standard come /SD Card/Music ecc. all'interno della libreria. Se il contenuto della scheda SD sembra mancare, puoi aggiungere manualmente nuove posizioni tramite Options > Choose library folders.
Sincronizzazione del profilo
Per sincronizzare i contenuti, MediaMonkey per Android e MediaMonkey per Windows devono essere configurati per riconoscersi a vicenda in modo da potersi sincronizzare. Consulta questo articolo se MediaMonkey per Windows non riconosce il tuo dispositivo o se il tuo dispositivo non riesce a vedere MediaMonkey per Windows.
Articoli correlati:
Sincronizzare MediaMonkey con un dispositivo Android [guida in linea]
